


 24/7 Emergency Service
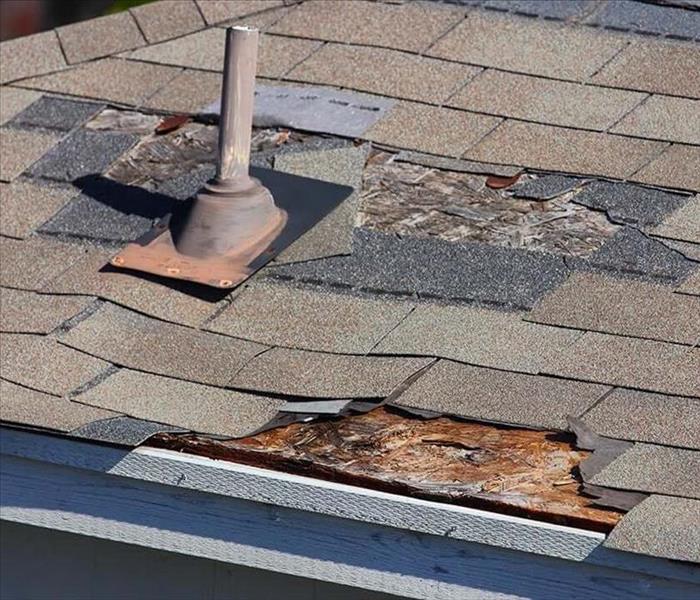
Roof Leaks in Cherry Hill, NJ, Shingle Damage in Moorestown, NJ, Chimney Leaks, and Tips for Preventing Leaks
5/24/2017 (Permalink)
 Roof Leaks in Cherry Hill, NJ, Shingle Damage in Moorestown, NJ, Chimney Leaks, and Tips for Preventing Leaks
Check for damage in the roofing material directly above where the leak is coming in. This will likely be easier to find on a flat roof, but leaks can also come into the house a good distance from where the actual roof damage is located.If your roof is slanted, inspect areas on the roof that are higher than where the leak enters the home.
If you have an attic, inspect it with a flashlight for water stains, black marks or mold.
Run a hose along different sections of the roof and have a person inside alert you when leaking occurs.
Look for damaged, curled or missing shingles near where the leak is coming in. Look closely for exposed roofing tacks, too.
Straighten out shingles that are curled back. In colder weather, this might require that you soften the shingle edge with heat, such as an electric hair dryer. Using a torch or other open flame heat source isn't recommended since asphalt shingles may be flammable, and regardless of whether they are flame retardant or not, excess heat will ruin the shingle.
Reattach curled-back shingles after straightening with a generous amount of asphalt roof cement or compound around the exposed edges.
Replace damaged shingles. If the shingle lifts off the roof with little effort, breaks, or simply crumbles, it needs to be replaced.Remove the old shingle by lifting its edges and prying out the nail.
Scrape the area underneath it to remove any leftover roofing cement.
Use a sharp utility knife to round the back corners of the new shingle slightly.
Slide the new shingle into place and drive 1 1⁄4 inch (3.2 cm) galvanized roofing nails into each upper corner, then cover the nail heads with roof cement.
Inspect for cracks or blisters in the roofing material.
Mend the blisters. Cut a line through the middle of the blister with a utility knife, but do not cut the sound roofing felt {substrate) underneath.Squeeze out or soak up any water inside the blister. The area needs to be completely dry.
Spread a generous amount of roofing cement under the loose roofing material and press down.
Drive galvanized roofing nails along each side of the repaired blister.
Inspect areas where surfaces connect, such as a chimney or vent pipe.
Look for damage to the caulking, and reapply caulk where necessary.
Remove damaged or deteriorated caulking so the new application can bond to the roof or flashing surface.
Use a putty knife to remove the loosened old caulk.
Clean and dry the area.
Cut the tip off the caulk tube and spread a bead along the same line, working it into the crack with an applicator. Let it dry.
Larger-scale repairs will be necessary if there is damage to the flashing around the chimney or the boots around vents, as these features may need to be replaced.